
Hungry Ghost
Unity Editor Tools - Create Better Games Faster!
Make the Unity Editor work for you and your game!
It takes an incredible amount of work to create a fun, polished game and release it on a platform for players to enjoy. So any techniques that help save you time in the long run are definitely worth investing in. An effective, yet often overlooked, workflow optimization is to create your own editor tools and scripts to help with common game development tasks. These scripts likely won't ship with your game, but will help with the process of building the game itself.
Here are 3 great reasons why you should be creating/using editor tools for your project:
- Saving time
- Reducing bugs
- Finding the fun
Number 1. Saving Time
Any task that you find yourself performing multiple times during the development of your game is a candidate for being replaced with a script, tool, or command of some kind. Even if it seems like a tiny step, the time savings in the long run can be monumental. Not to mention the benefit to others on your team who won't need to relearn everything you discovered. And even if you are working on a game on your own, your future self will thank you.
An example of this is a tool I created recently to help me switch the fonts across the whole game to a new font asset whenever I needed to. The first time I was switching the fonts, it seemed easier to just visit each text object in the hierarchy and update it manually, but instead I spent 20 minutes and created a tool that would properly switch all the text objects in the game to a new font (button text, dialog titles, UI, and long paragraphs could all specify their own font to use). Well sure enough before shipping the game, I needed to test out a few more fonts in the build, and it literally only took seconds to use the tool and run the new build. Without that tool, each font change would have taken at least 30 minutes to integrate.
Number 2. Reducing Bugs
Any multi-step task that you have to perform can result in a bug if you aren't careful, especially if it's been a while since you last had to perform that task. For example: setting up an enemy in your game might require a special component, and an audio source using a specific output channel, and a specific object tag, and a collider that's marked as a trigger, etc. Making a special tool or command to do the heavy lifting can act as a form of documentation, and things will go much smoother for you. And any time not spent hunting down bugs (especially when you're in the final week and trying to ship) is time well saved.
Number 3. Finding the fun
I'm a strong believer in doing whatever you can to support the creative process designing your game. If you want to make a game with lots of interesting items, then it should be extremely easy to make a new item. If you want a bunch of weapons, or traps, then it should be easy for the developers/designers/artists/etc to create a new weapon or trap. Making a game takes iteration. It takes experimentation and risks. You don't want to lose a bunch of time to an idea that didn't quite work out, and you also don't want to have not even tried the idea in the first place because your tool set made it too difficult for you.
Another important thing to note is that sometimes the creative process works best in a format that doesn't match the Unity Editor's UI. Maybe you'd rather write your dialog in a program with spell check. Maybe you'd rather design your level config in Excel or another spreadsheet program. When you're trying to be creative, you want to make it as easy as possible to let the ideas flow out of your head, and then use custom editor tools and scripts to convert that data into the format you need for the engine and your game.
Luckily, the Unity Editor was built with all these types of tools in mind! And there are several easy ways to extend it and start improving your process today!
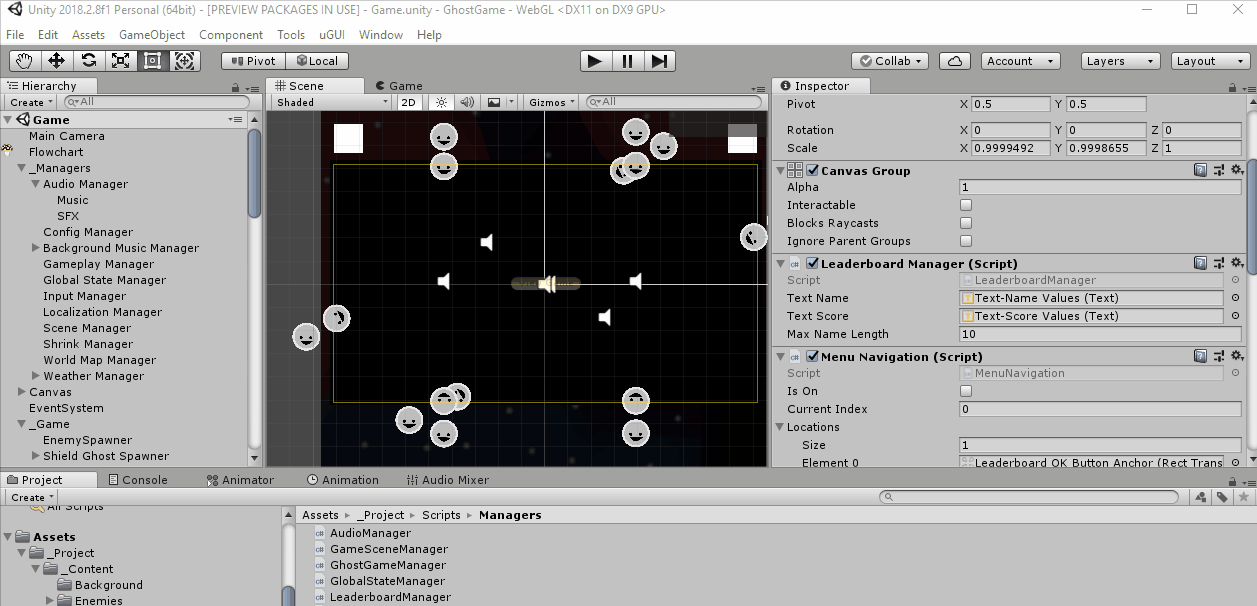
Customizing the Inspector
In Unity, we spend so much time looking at the Inspector window. We go here to set up new behaviors, modify values while running the game, hunt down bugs on certain components, and more. The least we can do is make sure that our component scripts are easy to read in the Inspector, and simplifies what we are looking at so we get the most bang for our buck.
Here are a few quick ways to start improving how your scripts look in the Inspector window. (And this will also greatly help the members on your team who aren't so eager to dive into a C# script to see what's going on.)
Adding Attributes to Component Script Properties
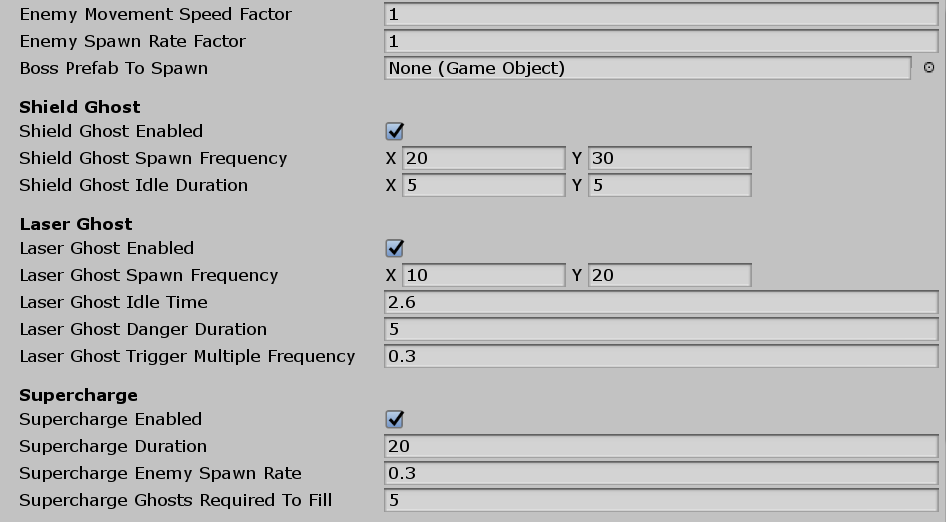
The [Header] attribute gives a quick way to separate your component properties into logical groupings. This helps you find what you need faster, and avoid mixing up similar naming properties that belong to different headers.
To use in your code, it would look like this:
[Header("Shield Ghost")]
public bool shieldGhostEnabled = true;
public Vector2 shieldGhostSpawnFrequency = new Vector2(15, 30);
public Vector2 shieldGhostIdleDuration = new Vector2(10, 10);
[Header("Laser Ghost")]
public bool laserGhostEnabled = true;
public Vector2 laserGhostSpawnFrequency = new Vector2(10, 20);
public float laserGhostIdleTime = 2.6f;
public float laserGhostDangerDuration = 5;
public float laserGhostTriggerMultipleFrequency = 0.2f;
And then in the Inspector window it will create a spacer and display your header text in bold.
Similarly, Unity automatically provides a few more Attributes that you can use which are really useful:
- Tooltip: Provide a message that appears when you hover the mouse over a property in the Inspector. (Ex: Indicate whether a percentage is meant to be a value from 0 to 1, or from 0 to 100)
- TextArea and Multiline: These provide a way to enter text that consists of several lines into the Inspector (by default a string variable won't be able to take new line characters).
- HideInInspector: This will avoid exposing a parameter to the Inspector that shouldn't be modified or set from there (ie. you probably only want other scripts accessing that value)
Creating your own Attributes
At some point, you may even want to create your own attribute that you can put on a property to help change the appearance of a value in the Inspector. Unity provides a rich framework for you to customize the look and behavior of properties.
One example is having an attribute that lets you hide a property when it doesn't apply based on the value of another property on the component. In this example, when specifying the Win Condition for a level config object, I only display the properties that pertain to that win condition, and hide the others.
Below you can see the finished product, how I use the ConditionalProperty attribute in the code, and the implementation of the ConditionalProperty attribute.
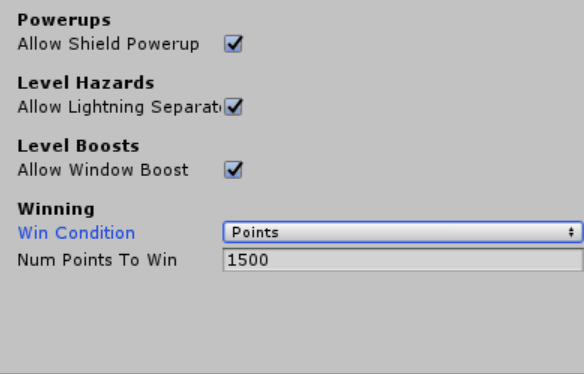
Below you can see the [ConditionalProperty] attribute being added to any property that I may need to hide based on the context.

Below is the ConditionalPropertyAttribute.cs script, which can be located anywhere in your project. This script simply creates an attribute that can decorate your code, and specifies all the parameters that will be captured and used by the attribute (in this case, the name of a property, and the value that it has to match).
using System;
using UnityEngine;
[AttributeUsage(AttributeTargets.Field)]
public class ConditionalPropertyAttribute : PropertyAttribute
{
    public string propertyToCheck;
    public object compareValue;
    public ConditionalPropertyAttribute(string propertyToCheck, object compareValue)
    {
        this.propertyToCheck = propertyToCheck;
        this.compareValue = compareValue;
    }
}
Below is the ConditionalPropertyAttributeDrawer script, which must be located within a folder named "Editor" somewhere in your project. (Any folder named "Editor" will be automatically detected by Unity, and its scripts will only be included when the game is running in the Unity Editor. Unity will also allow those scripts to access the UnityEditor namespace.)
using System;
using UnityEngine;
using UnityEditor;
/// <summary>
/// Note: Doesn't work on arrays or lists because of how Unity works. It can hide the elements of the array, but not the array property itself.
/// </summary>
[CustomPropertyDrawer(typeof(ConditionalPropertyAttribute))]
public class ConditionalPropertyAttributeDrawer : PropertyDrawer
{
    public override void OnGUI(Rect position, SerializedProperty property, GUIContent label)
    {
        bool isVisible = IsVisible(property);
        if (isVisible)
        {
            EditorGUI.BeginProperty(position, label, property);
            EditorGUI.PropertyField(position, property, label, true);
            EditorGUI.EndProperty();
        }
    }
    public override float GetPropertyHeight(SerializedProperty property, GUIContent label)
    {
        // Make the height 0 if we aren't drawing the property, otherwise a blank space appears in the inspector
        bool isVisible = IsVisible(property);
        float height = 0;
        if (isVisible)
        {
            height = EditorGUI.GetPropertyHeight(property);
        }
        return height;
    }
    private bool IsVisible(SerializedProperty property)
    {
        // Extract info from the attribute
        var conditionalPropertyAttribute = this.attribute as ConditionalPropertyAttribute;
        if (conditionalPropertyAttribute == null)
        {
            Debug.LogError("ConditionPropertyAttributeDrawer couldn't cast attribute to ConditionalPropertyAttribute");
        }
        string propertyToCheckName = conditionalPropertyAttribute.propertyToCheck;
        string requiredValue = "null";
        if (conditionalPropertyAttribute.compareValue != null)
        {
            requiredValue = conditionalPropertyAttribute.compareValue.ToString();
        }
        bool isVisible = true; // Default to visible if the logic isn't working out (properties can't be found, etc)
        // Determine if we need to hide the property
        if (!string.IsNullOrEmpty(propertyToCheckName))
        {
            // Make sure we can find the property it depends on
            var propertyToCheck = property.serializedObject.FindProperty(propertyToCheckName)
            if (propertyToCheck != null)
            {
                string actualValue = propertyToCheck.AsStringValue();
                // See if the values match
                isVisible = string.Equals(requiredValue, actualValue, StringComparison.OrdinalIgnoreCase);
            }
        }
        return isVisible;
    }
}
Using this script as a model, you can create your own custom behaviors for attributes to suit your own game's needs.
Custom Buttons
You can also add a button to an Inspector for a component so that you can invoke a certain behavior whenever it is clicked (either during the game, or even when sitting in the editor without the game running). In this case, I have a SimpleAudioEvent script that takes an array of audio clips, a range for the volume, and a range for the pitch. The SimpleAudioEvent script then has a Play method which will randomly choose a clip, volume, and pitch and play the sound. It is useful for me to have a "Preview Sound" button so I can hear several examples of what the sound might be without having to run the game and trigger the actual scenario several times in a row.
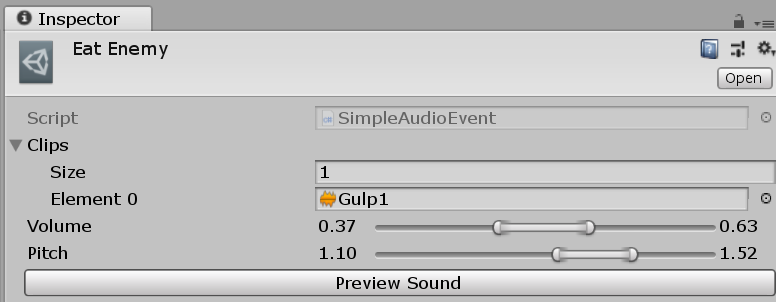
The AudioEventEditor script must be located in a folder called "Editor" somewhere in your project. This script uses the OnInspectorGUI method to draw the component as usual, and also add a button named "Preview Sound". When the button is clicked, it calls the "Play" method on the component, passing in an AudioSource which would normally be provided by the game code when actually playing the game.
using UnityEditor;
using UnityEngine;
[CustomEditor(typeof(SimpleAudioEvent), true)]
public class AudioEventEditor : Editor
{
    [SerializeField]
    private AudioSource _previewer;
    public void OnEnable()
    {
        _previewer = EditorUtility.CreateGameObjectWithHideFlags(
            "Audio preview",
            HideFlags.HideAndDontSave,
            typeof(AudioSource)).GetComponent<audiosource>();
    }
    public void OnDisable()
    {
        DestroyImmediate(_previewer.gameObject);
    }
    public override void OnInspectorGUI()
    {
        DrawDefaultInspector();
        EditorGUI.BeginDisabledGroup(serializedObject.isEditingMultipleObjects);
        if (GUILayout.Button("Preview Sound"))
        {
            var audioEvent = (SimpleAudioEvent)target;
            audioEvent.Play(_previewer);
        }
        EditorGUI.EndDisabledGroup();
    }
}
You could also use a button to trigger different game state situations, or a certain behavior on an enemy object as needed to test out different scenarios with ease. For example, adding a button on your Enemy component that sends it into an aggressive/battle mode.
Custom Menu Options
It's actually quite simple to add your own custom menu options in the Unity Editor. Which allows you to execute a segment of code which can act on its own, or based on some context such as the current objects selected in the Hierarchy window.
Here is an example which creates a pair of menu commands for working with the PlayerPrefs class.

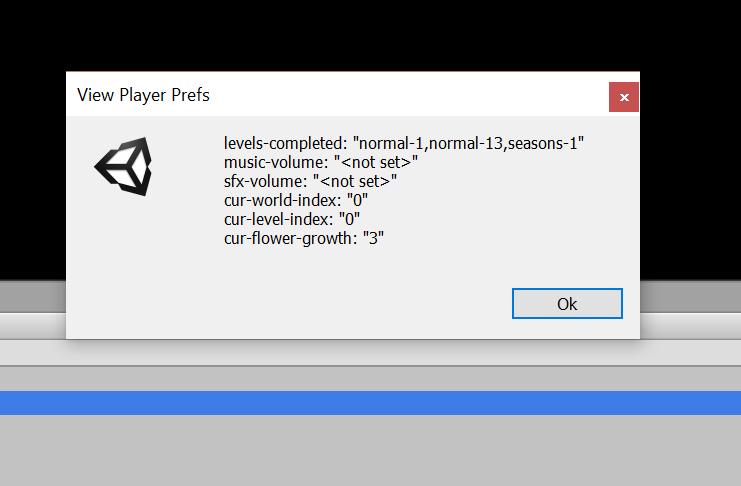
To create the custom MenuItem, you just need to create a script in an "Editor" folder that uses the MenuItem attribute. The string passed in to the MenuItem constructor provides the names and sub-levels of the menu command.
using UnityEngine;
using UnityEditor;
public class PlayerPrefsEditorMenu
{
    [MenuItem("Tools/Nanaimo Labs/PlayerPrefs/Delete All")]
    public static void ClearPlayerPrefs()
    {
        bool confirm = EditorUtility.DisplayDialog(
            "Delete All Player Prefs",
            "Are you sure you want to delete all PlayerPrefs?",
            "Yes",
            "Cancel");
        if (confirm)
        {
            PlayerPrefs.DeleteAll();
            EditorUtility.DisplayDialog(
                "Delete All Player Prefs",
                "The PlayerPref values have been deleted.",
                "Ok");
        }
    }
    [MenuItem("Tools/Nanaimo Labs/PlayerPrefs/View All &p")]
    public static void ViewPlayerPrefs()
    {
        string data = "Not Implemented";
        // Edit this to call your own class
        data = StorageManager.DebugString();
        EditorUtility.DisplayDialog(
            "View Player Prefs",
            data,
            "Ok");
    }
}
Below is another example of a MenuItem, and this one is able to create a new GameObject in the hierarchy and set it as the parent of whichever object you currently have selected. It also uses the UnityEditor.Undo class to make sure the operation works nicely with the Unity Undo system.
using UnityEngine;
using UnityEditor;
public class GameObjectHelperMenu
{
    [MenuItem("Tools/Nanaimo Labs/Game Object/Create parent at position")]
    public static void CreateParent()
    {
        GameObject selectedObject = Selection.activeGameObject;
        if (selectedObject == null)
        {
            EditorUtility.DisplayDialog(
                "Error",
                "You must selected an object in the Hierarchy before using this command.",
                "Ok");
            return;
        }
        // Create a new object
        GameObject newParent = new GameObject();
        newParent.name = "New Parent";
        Undo.RegisterCreatedObjectUndo(newParent, "New Parent Object");
        // Position the parent at the same spot at the child
        newParent.transform.position = selectedObject.transform.position;
        // Insert the new parent object between the selection and its current parent
        newParent.transform.parent = selectedObject.transform.parent;
        // Change the selected object's parent
        Undo.SetTransformParent(selectedObject.transform, newParent.transform, "Reparent");
    }
}
More Customizations
If it suits your purposes, you can even go so far as to create your own custom window inside of the Unity Editor. This is often utilized by the more comprehensive packages in the Unity Asset Store, as it gives the author complete freedom and customization over the workflow you experience with their product. You can find out more about how to create these windows within Unity by going here.
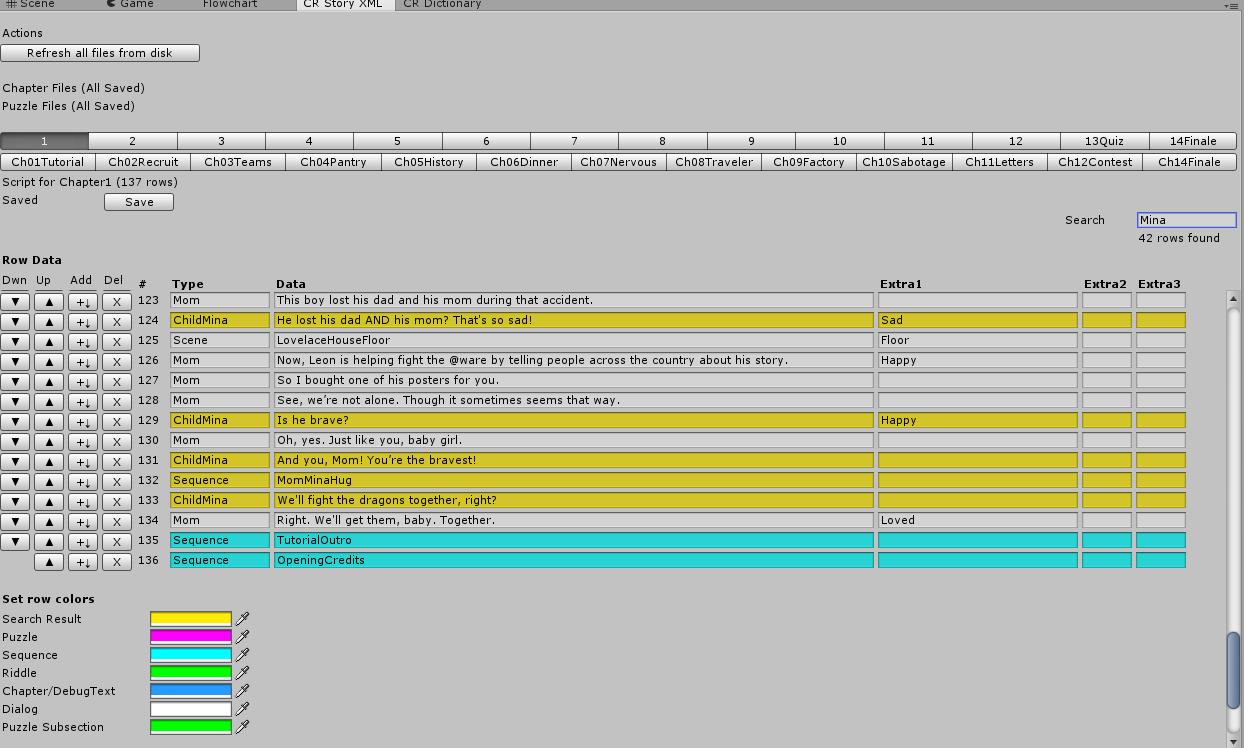
Below is a simple example of a custom window.

And here is the code that it takes to create that custom window. (Place this in a script in an "Editor" folder.) It really doesn't take much, and you can have a place to keep adding to over the length of your project.
using UnityEditor;
using UnityEngine;
public class CustomWindow : EditorWindow
{
    private string input1 = "<value>";
    [MenuItem("Window/Custom Window")]
    public static void ShowWindow()
    {
        EditorWindow.GetWindow(typeof(CustomWindow));
    }
    private void OnGUI()
    {
        GUILayout.Label("Custom Window Controls");
        if (GUILayout.Button("Action 1"))
        {
            Debug.Log("Action 1 clicked");
        }
        if (GUILayout.Button("Action 2"))
        {
            Debug.Log("Action 2 clicked");
        }
        input1 = EditorGUILayout.TextField("Input 1", input1);
    }
}
This is a screenshot of a custom Unity editor window I created for our game Code Romantic, which is a visual novel that contains a large amount of dialog and scripted events mixed in to run puzzles, move the characters, play sound effects, etc.
Final Takeaways
The best possible tool you can create for the Unity Editor, is the one you are going to use. Since every game delivers a unique experience, so too is the process of building that game a unique experience. Try to analyze where your time is being spent, and what types of tasks could be improved with the help of a quick script or tool.
If you aren't using Unity, then your engine of choice probably has a similar way to extend it. Or consider using any other scripting language (PowerShell and python are good choices) to suit your needs. I have personally created many PowerShell scripts to convert dialog and level data into a format that I could then work with inside my Unity project (JSON or XML).
And lastly, don't forget to save copies of your tools to bring forward and modify for your next project!
Thanks for reading. If you'd like to know when I write more articles like this, follow me on Unity Connect! You can also follow the Twitter for my indie game studio: Pretty Smart Games here: @PrettySmartNews
Now go out and make your game!
Comments
Log in with itch.io to leave a comment.
This is great!!! just started using a lot of it in a project . Thanks
That's great! Let me know if you discover any new simple techniques that pay off in the long run! Good luck!
Very helpful article! Thanks for writing it up.
No problem! Good luck with your games!